Friday 20 October 2023

Halloween Preparations - Part Two

My non-spooky Halloween room box is finished!

And here it is looking a lot more lived-in.

Here we have the left-hand side.

I thoroughly enjoyed raiding my 'stash' for bits and pieces to fill up the shelves.

Did you spot the sweetest little baby mouse asleep in his walnut crib by the stove? Bought from MomapawsHomecraft on Etsy.

The stove corner looks much cosier with all of its copper-ware in place.

Next we have a view of the middle of the room.

The re-modelled sink unit looks very at home.

As does the little cupboard above it, made from two of its doors.

And here we have a view of the right-hand side of the room.

I'm glad I stuck with the dark wood corner shelves which do look much lighter now that they are full of provisions.

The kitchen is well-stocked with bread and cheese for snacks - essential mouse fodder!

I went to town with nick nacks on the shelves...

...and walls.

Everything on the shelves is held in place with Tacky Wax - that's a lot of Tacky Wax!

Poppy and Pip, the little mice made by my mother, are all set for their Trick or Treat excursion...

...with their pumpkin, a bag for treats and a flask of hot tea. There is also a special Halloween cake for when they get back home (alas, not my work but a present from a friend). I'm not sure what the KitKats are for, maybe insurance in case the neighbours all turn off their lights and hide behind their sofas!

And this is a photo of the lit room box, taken in the dark.

I hope the kids like it when Halloween arrives, but actually, it's been such good fun to do, I don't really care, ha ha!

Until next time,
Zoe

Friday 29 September 2023

Halloween Preparations - Part One

Last Halloween, I decided it was about time I made some sort of miniature diorama to put on display for visiting Trick or Treaters. I didn't have time to do it then but I've been busy with the project over the last couple of weeks and will definitely be ready for Halloween this year.

Naturally, it being Halloween, I had some sort of ghoulish scene in mind but I found I couldn't get excited about that. It just didn't feel like me.


Then I spotted some very cute kits for little felt Halloween mouse children on Etsy. I ordered the kits and my mum made them up - I hate sewing but my mum loves it.

She did a brilliant job. Instead of a ghoulish scene, I decided I would make a mouse kitchen in which to display the two mouse children preparing to go out Trick or Treating. This felt much more up my street.

Nothing much happened for several months - only a bit of plotting and planning - and then in June I found the perfect glass-fronted room box at York Dolls' House Fair.

It was very cheap and had previously been used to display a butcher's shop diorama, so I started by stripping off all of the papers both inside and out.


The plan is to only use things in my large and varied 'stash' for this project, and luckily I had a bag of wood veneers, one of which I used to make floorboards for the kitchen. I cut out strips and used wood glue to stick them down.

To get the 'floorboards' to dry flat, I laid a flat piece of wood on top and stacked a load of tins from the pantry on top of it to weigh it down.


It worked well. Next I painted the floor with a dark oak wood stain, making sure that plenty of the stain went into the cracks to emphasise the gaps between the boards: as this is a mouse house in an imaginary hole in the ground, I want it to be a little on the rough and ready side.


And finally, I gave the floor a coat of Humbrol Matt Cote (my favourite matt varnish for miniatures) and a light sanding to age it a little once it was dry. I'm very happy with the rustic finish.

Next up was the ceiling. To create an underground feel, I shaped some 3D 'roots' from brown paper soaked in wallpaper paste. These took an age to dry but that at least gave me an opportunity to get on with some of the furnishings.


I didn't really know where I was going with the furniture but decided just to crack on and see where it took me.

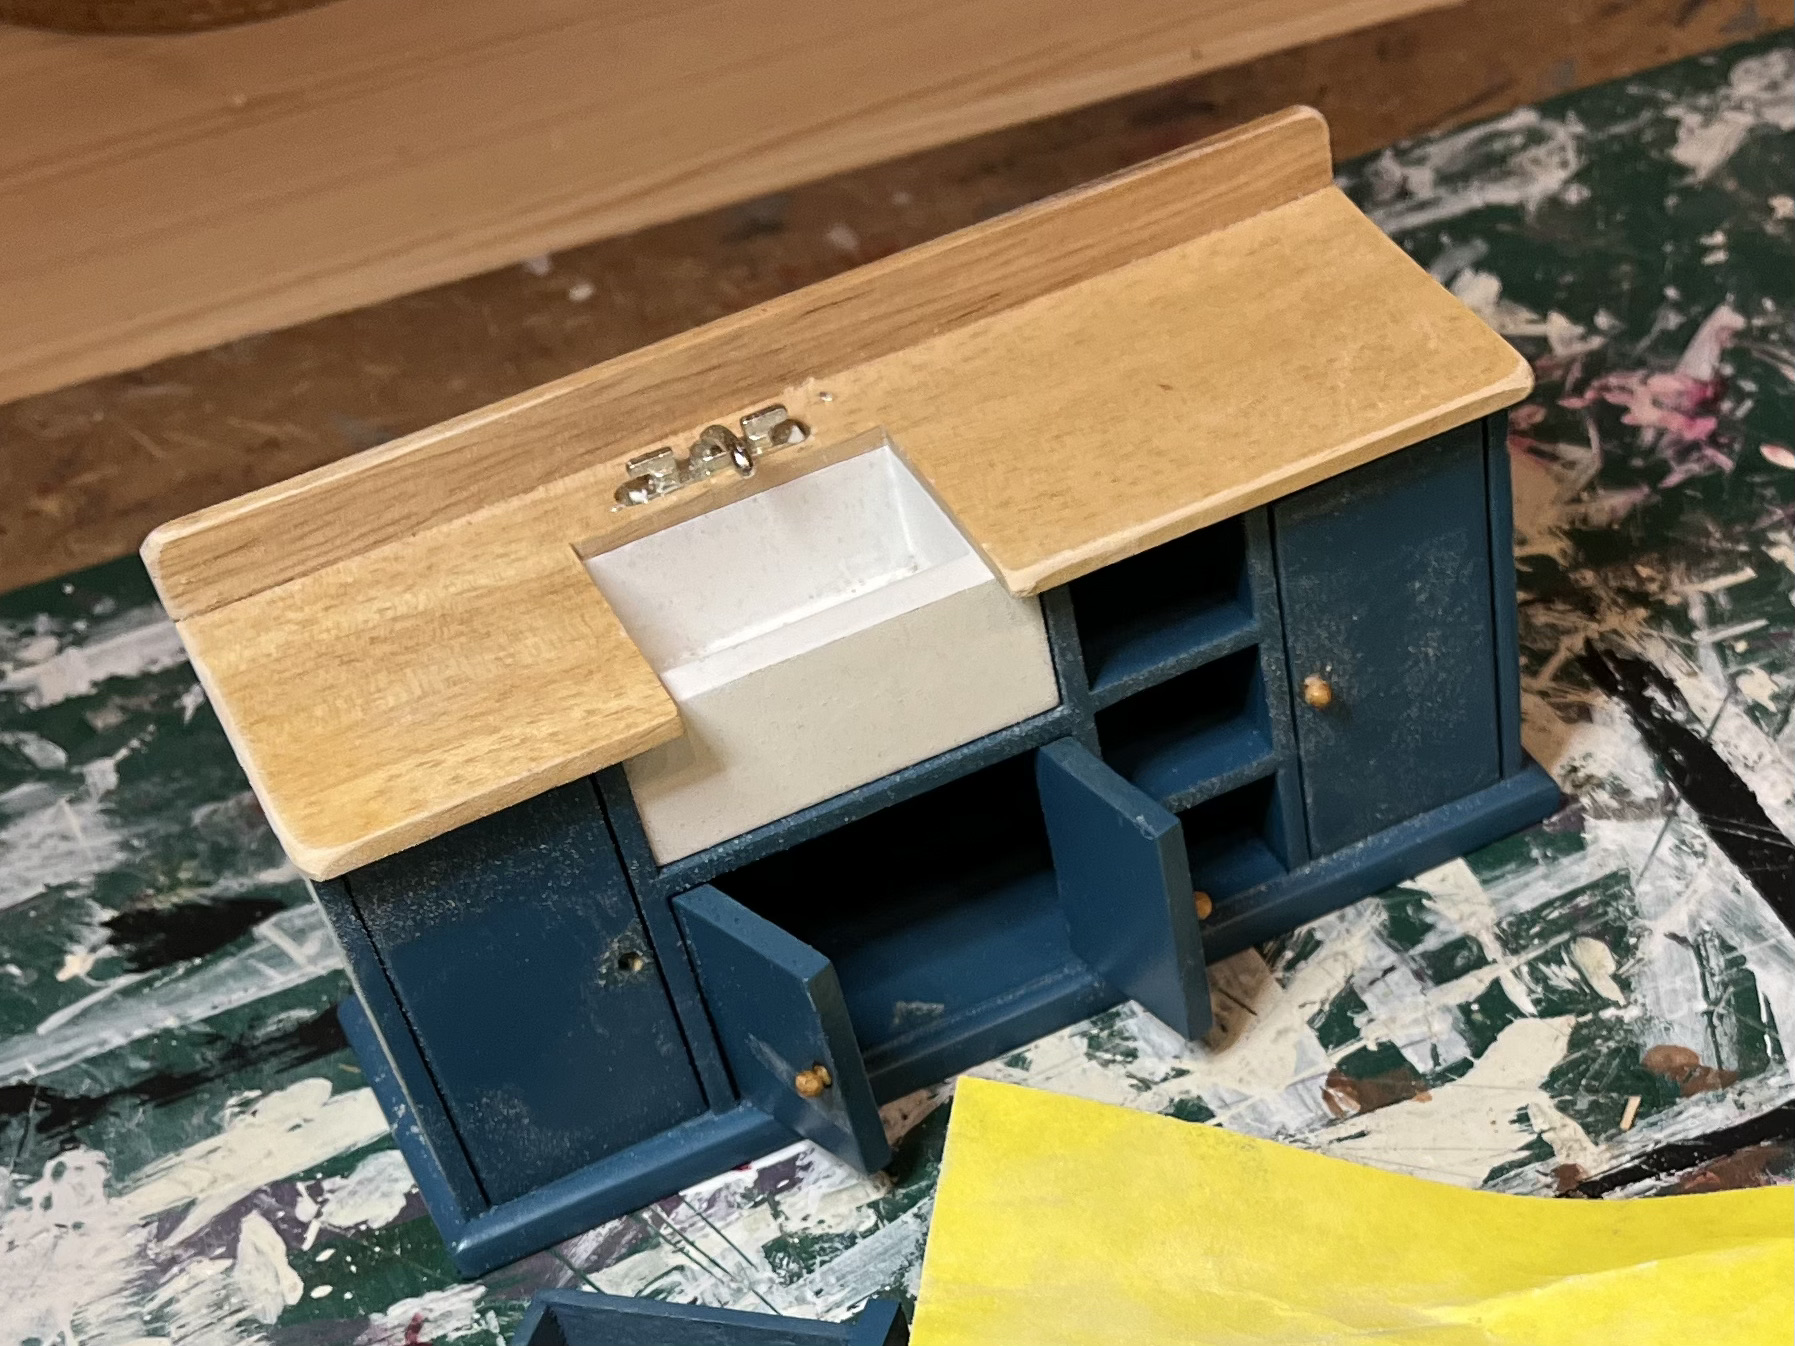
I started with a fairly modern sink unit I had in my stash. Initially I was just going to rough it up with some sandpaper but I was soon pulling off taps and doors and generally getting stuck in with a full refurb!

This is it with three of the cupboard doors removed, taps gone, lines etched into the draining board and doors, and distressed all over. I liked the colour so that stayed.


And this is it all finished. I initially had a strip of 'Delft tiles' long the back but then I decided that a mouse house should be more colourful (don't ask me why!) and I was much happier once they were replaced with this strip of sticky tape.

This first piece set the colour scheme for the whole room.


Oh and I added a little plug hole since there was nowhere for the water to drain out!


My next victim was another modern piece. I removed the vinyl coverings from the shelves and sanded the life out of the rest of it.


I decided to use the colourful sticky tape as a theme running through the different pieces of furniture, so I covered the shelves of this piece with it. The paintwork fitted with the newly decided scheme so I didn't change that.


Though in the end I did paint the drawers red (and replaced the knobs with fancy beads) to tie it in more with the next two pieces of furniture.


This was a nicely made dark brown dresser but it had a strange plastic feel to its finish which I'd never liked. I sprayed it with grey Rustoleum Surface Primer and then used acrylic paint in this nice deep red colour to tie in with the red in the coloured tape on the other two pieces.

It then got a coat of Humbrol Matt Cote and a good sanding to give it a distressed look. I was going to add some of the colourful sticky tape but the decided that it might be a bit too much if everything was overly coordinated. 


I did, however, add a strip to this piece which was green until I painted over that with the same deep red acrylic paint used for the dresser.


Back in the room box the 'roots' had at last dried out. I gave the walls a coat of white acrylic paint. I had intended to give them two coats but then I decided that I liked the rougher effect of the single coat.

I painted the 'earth' ceiling dark brown but decided it was too dark. So I lightened it and made the 'roots' dark brown instead.


Next I dirtied the tops of the walls up a bit. I figured that there'd be a bit of damp in the corners away from the warmth of the room and a few cracks here and there.

I also added a supporting beam to prevent landslides! It's actually made from a piece of kindling from our log basket, sanded and stained dark oak.

You can see from this photo of the upside-down room that I have attached the furniture to the walls. I'll be carrying the room up and down two flights of stairs on Halloween (maybe for many years to come, who knows!) so I don't want everything sliding around in it.

You can also see that I've added a strip of battery operated LED lights to the top front edge. They are warm white and shine just the right level of light into the room whilst being hidden behind the wooden frame of the glass front. The lights have a self-adhesive strip but I was worried it wouldn't adhere to the painted surface properly so I painted a coat of Humbrol Matt Cote where they were would go and stuck them to that when it was dry. They seem pretty secure.


I cut a little grove into the corner of the box for the wire and will attach the little battery box to he top of the room box with double-sided sticky tape.


Every kitchen needs a stove and I had this lovely heavy cast iron one in my stash and it was just the right size. The flue, the shelf, and the fancy bits (vintage shelf trim and buttons) just sort of evolved as I tried to tie this corner in with the colour scheme for the rest of the room.


And here it is starting to come together. I added more shelves to the room in the form of an old dark brown wooden shelf unit which I stuck to the wall upside-down. I didn't want all of the furniture to be painted but have a concern that this looks too dark, however, I've stuck with it because I know it will look lighter (and hopefully less like an upside-down shelf unit!) once filled with bits and pieces.

Other additions are: a little cupboard made using the two doors I removed from the sink unit, a little table (vintage Pit-a-Pat) and two chairs which were green before I gave them a good sanding.

So, that's it so far. I'm thoroughly enjoying the freedom to do what I like with this project and it's so long since I did anything like this that I'm quite relieved to see it coming together.

Next step is to add all of the bits and pieces which bring a scene to life. I want it to be a warm, welcoming, homely and quite cluttered little kitchen. We'll see how that goes in Part Two!

Until next time,

Zoe

Sunday 30 July 2023

Yootha Rose

 Yesterday I was in Edinburgh with my friend and fellow dolls' house fanatic Jenny and we stumbled across this beautiful dolls' house collage in an antique shop:


Of course we were quite intrigued by it and immediately wondered who might have made it.


Luckily it was signed. I have to admit that the name Yootha Rose meant nothing to me, however, Jenny recognised it immediately as being that of a lady who designed and made toys in and around the 1970s.

Spotting our enthusiasm for the picture, the owner of the shop came to tell us that Yootha Rose had made toys for the Royal Family. I think this was by way of an explanation for the £800 price tag.

Resigned to the fact that the price was beyond what either of us was prepared to pay, we tried to tell ourselves that the picture was probably too big to be carried safely through the very rainy streets of Edinburgh and home on the train in any case. But how either one of us would have loved to have taken it home...

At least the shop owner was happy for us to take photos of it and here are some close-ups of the rooms depicted:


Upper Floor Left


Upper Floor Right


Lower Floor Left


Lower Floor Right

____________________________________________________________________

A Bit About Yootha Rose (1899-1988)

Because I had never heard of Yootha Rose and because I love to learn, I have of course been searching the internet for information about her. This is what I've found:

From Ancestry.co.uk:

  • Full name Yootha Madge Millais Rose.
  • Born January 1899 in Melbourne, Australia.
  • Father Charles Rose an English light tenor of some note born July 1866 in Devizes, Wiltshire, UK.
  • Mother Magdalen Elizabeth Rose born in Cape Town, South Africa, March 1865.
  • 1900 sister Beryll Phyllis Rose also born in Melbourne, Australia.
  • 1911 census (age 12) living with parents and sister in Chelsea, London.
  • 1925 married to Percy Philipps [born March, 1889).
  • 1939 England and Wales Register: Yootha Philipps (age 40) living in Blandford Road, Dorset with husband Percy Philipps (age 50) who was a retired "Estimating Clerk" (an Estimating Clerk usually works in the Sales Department of an organisation). No children listed as living at address.
  • 1945 father died (aged 79) in Harwich, Essex, UK.
  • 1949 mother died aged 84 in Kingston-upon-Thames.
  • 1978 husband Percy died
  • 1988 (May) Yootha's death was registered in Worthing, West Sussex.

From a “Personality of the Month” feature which appeared on the Royal Pavillion Museums & Libraries website in 2013 [obtained via openhouseminitaures blog]:

"Yootha Rose was born in Australia in 1899 when her father, the singer Charles Rose, was touring with Nellie Melba.

Afterwards the family returned to England and, when she was 18, Yootha joined a concert party and entertained troops during the First World War. She then went on to design sets for various West End musicals.

During the Second World War, she taught at a school in Dorset and it was here that she began making toys. She was a success, making 16 toys for the ‘Britain Can Make It’ exhibition and received orders for 40,000 more.

She also provided toys for royalty, including a roundabout for Prince Charles and dolls for Princess Anne.

Using pottery, wood, paper and fabrics, she created a wide range of toys, from carved wooden balloonists to tinsel angels.

In 1952, Yootha was appointed a trustee of the National Toy Museum. Seven years later she became its Honorary Curator. The Museum moved to the Grange in Rottingdean in 1959 and the collection was taken over by the Brighton Corporation in 1971.

It finally moved to Hove Museum & Art Gallery [now Hove Museum of Creativity] where many items from the collection are on display in the Wizard’s Attic gallery."


From VADS website:

In 1946 at least six different toys made by Yootha Rose were shown at the Britain Can Make It Exhibition, three of which were designed by her for Heal & Son Ltd.

From British Pathé website:

There is a lovely piece of 1952 British Pathé film footage about Yootha here.


From International Dolls' House News magazine:

There is a photo of Yootha Rose in the Winter 1971 issue of IDHN (Vol. 2. No.3.) where it also mentions that "Many of the toys in the Penshurst Toy Museum [near Royal Tunbridge Wells in Kent] are from Miss Rose's own collection", which appears still to be the case today.


In 1977 there was a retrospective exhibition of Yootha Rose's work (1911-1976) held at the Royal Pavilion Art Gallery and Museum, Brighton.


From the V&A Museum website:

Two of Yootha's watercolour designs for theatre productions are held by the V&A Museum, London.

From a 1978 article (unfortunately only available by subscription) in The New York Times entitled "Toymaker to the Royal Family":

The author of the article has clearly interviewed "Miss Rose" who is described as "The closest thing to a royal toy maker in the service of Queen Elizabeth II".

The article tells us that she had been making her hand-carved and hand-painted "carousels and doll houses" for the children of the royal family for 25 years, so starting in about 1953. Her first royal commission was from Queen Mary (Queen Elizabeth's grandmother) who ordered a carousel for Princess Anne and a miniature village for the children of Princess Alexandra (Queen Elizabeth's first cousin).

Another interesting snippet from the article tells us that Yootha also made "an eight-inch Christmas tree, with tiny toys dangling from its boughs, that is set up each December in the famous Queen Mary's doll house at Winsor Castle". I wonder if it is still set up at Christmas to this day.

The article gives the reader a fascinating insight into some of the toys Yootha was making at the time and an outline of the style of the toys she made ("roughly hewn but richly detailed... beguiling blends of the primitive and the sophisticated"), as well as how she liked to dress any characters depicted in her toys ("my period" or the years just after the end of the Edwardian period). It also mentions that she had a large following in the United States as well as in Britain and that her toys ranged in price from ten dollars for a small figure to three hundred dollars "for a miniature zoo".

I had to smile when I read this quote from Miss Rose: "in Britain, the children are completely uninterested in plastic dolls, with large bosoms and modern clothing" - I wonder what she would make of the Barbie movie breaking box office records in Britain and around the world just now!

At the end of the article we are informed that Miss Rose was widowed (it was actually written the year her husband died) with grandchildren living in Australia (though strangely I haven't turned up any records for children born to Percy and Yootha). It mentions too that she is living alone in a "three-storey house... filled from top to bottom with toys". Her address for "inquiries" was given as 24 Clermont Terrace, Brighton, Sussex, England.

____________________________________________________________________

Well, that's it so far. If anyone reading this has any more information about Yootha or perhaps even photos of her work - it would be wonderful to hear from you!

Until next time,
Zoe

Wednesday 28 June 2023

Stairway to Heaven Part 2

This post is a bit overdue since my lovely new dolls' housing space was finally completed at the beginning of March. I posted about it back in November last year when work on the loft conversion was just getting underway (you can read that post here).


In fairness, the new stair carpet was only just fitted a couple of weeks ago.


Et voilà! This side is my new dolls' house craft room.


And this side is my new dolls' house room. As the work neared completion, I was very pleasantly surprised (and not a little excited!) at just how much space I would have for my hobby!


Absolutely no problem filling it up however, ha ha!

It took me hours and hours to unpack everything but it was great fun and I even got some help from my kind friend Jenny.

I still have a lot of organising to do but it being summer now most of my activities are outdoor and progress is slow. However, I do climb the Stairway to Heaven whenever I have a spare hour or so and as they say in Yorkshire, I'm like a pig in muck up there!

Until next time,
Zoe


Klompen! (Clogs!)


In February 2018 I found my first Grecon Dutchman - you can read my excited post from back then here and that's him on the right in the photo below.


Since then I've found another two Dutchmen, with the most recent arrival actually wearing wooden 'Klompen' or clogs!


His blue felt hat and baggy trousers have faded quite a bit and he's obviously had a close encounter with the dreaded Moth, but he's still got a cheery smile on his swarthy [or it just grubby!] face.


He's an earlier example than my other two Dutch chaps and has the silver paper label.

Since he's missing a few stitches of hair at the back, we can see from this photo that he is a 'button head' - in fact, looking at this shot, I think he might be a little short of brains, ha ha!


Clearly he's of the larger scale - here he is standing next to Ludwig who is my only other Grecon to sport anything but lead feet.


The holes in the back of the wooden clogs tell me that they are the sort sold in souvenir shops in the Netherlands, tied together on a little string and sometimes attached to a keyring.

I've always thought that Ludwig's boots were made from the equivalent souvenir seen in Swiss and Austrian tourist shops (the Edelweiss featured on his boots being the national flower of both of those countries of course).  I wonder if Miss Cohn bought them while on holiday in these countries - we know that her brother lived in Switzerland.

Anyway, once again, Welkom Nederlandse Man! (Welcome Dutch Man!)

Until next time,
Zoe