In January 2019 I became the very happy owner of this neglected but nevertheless grand old dolls' house.
The Day of Arrival
The house came with written provenance and until late 2018 it had been in the same family for at least 160 years.
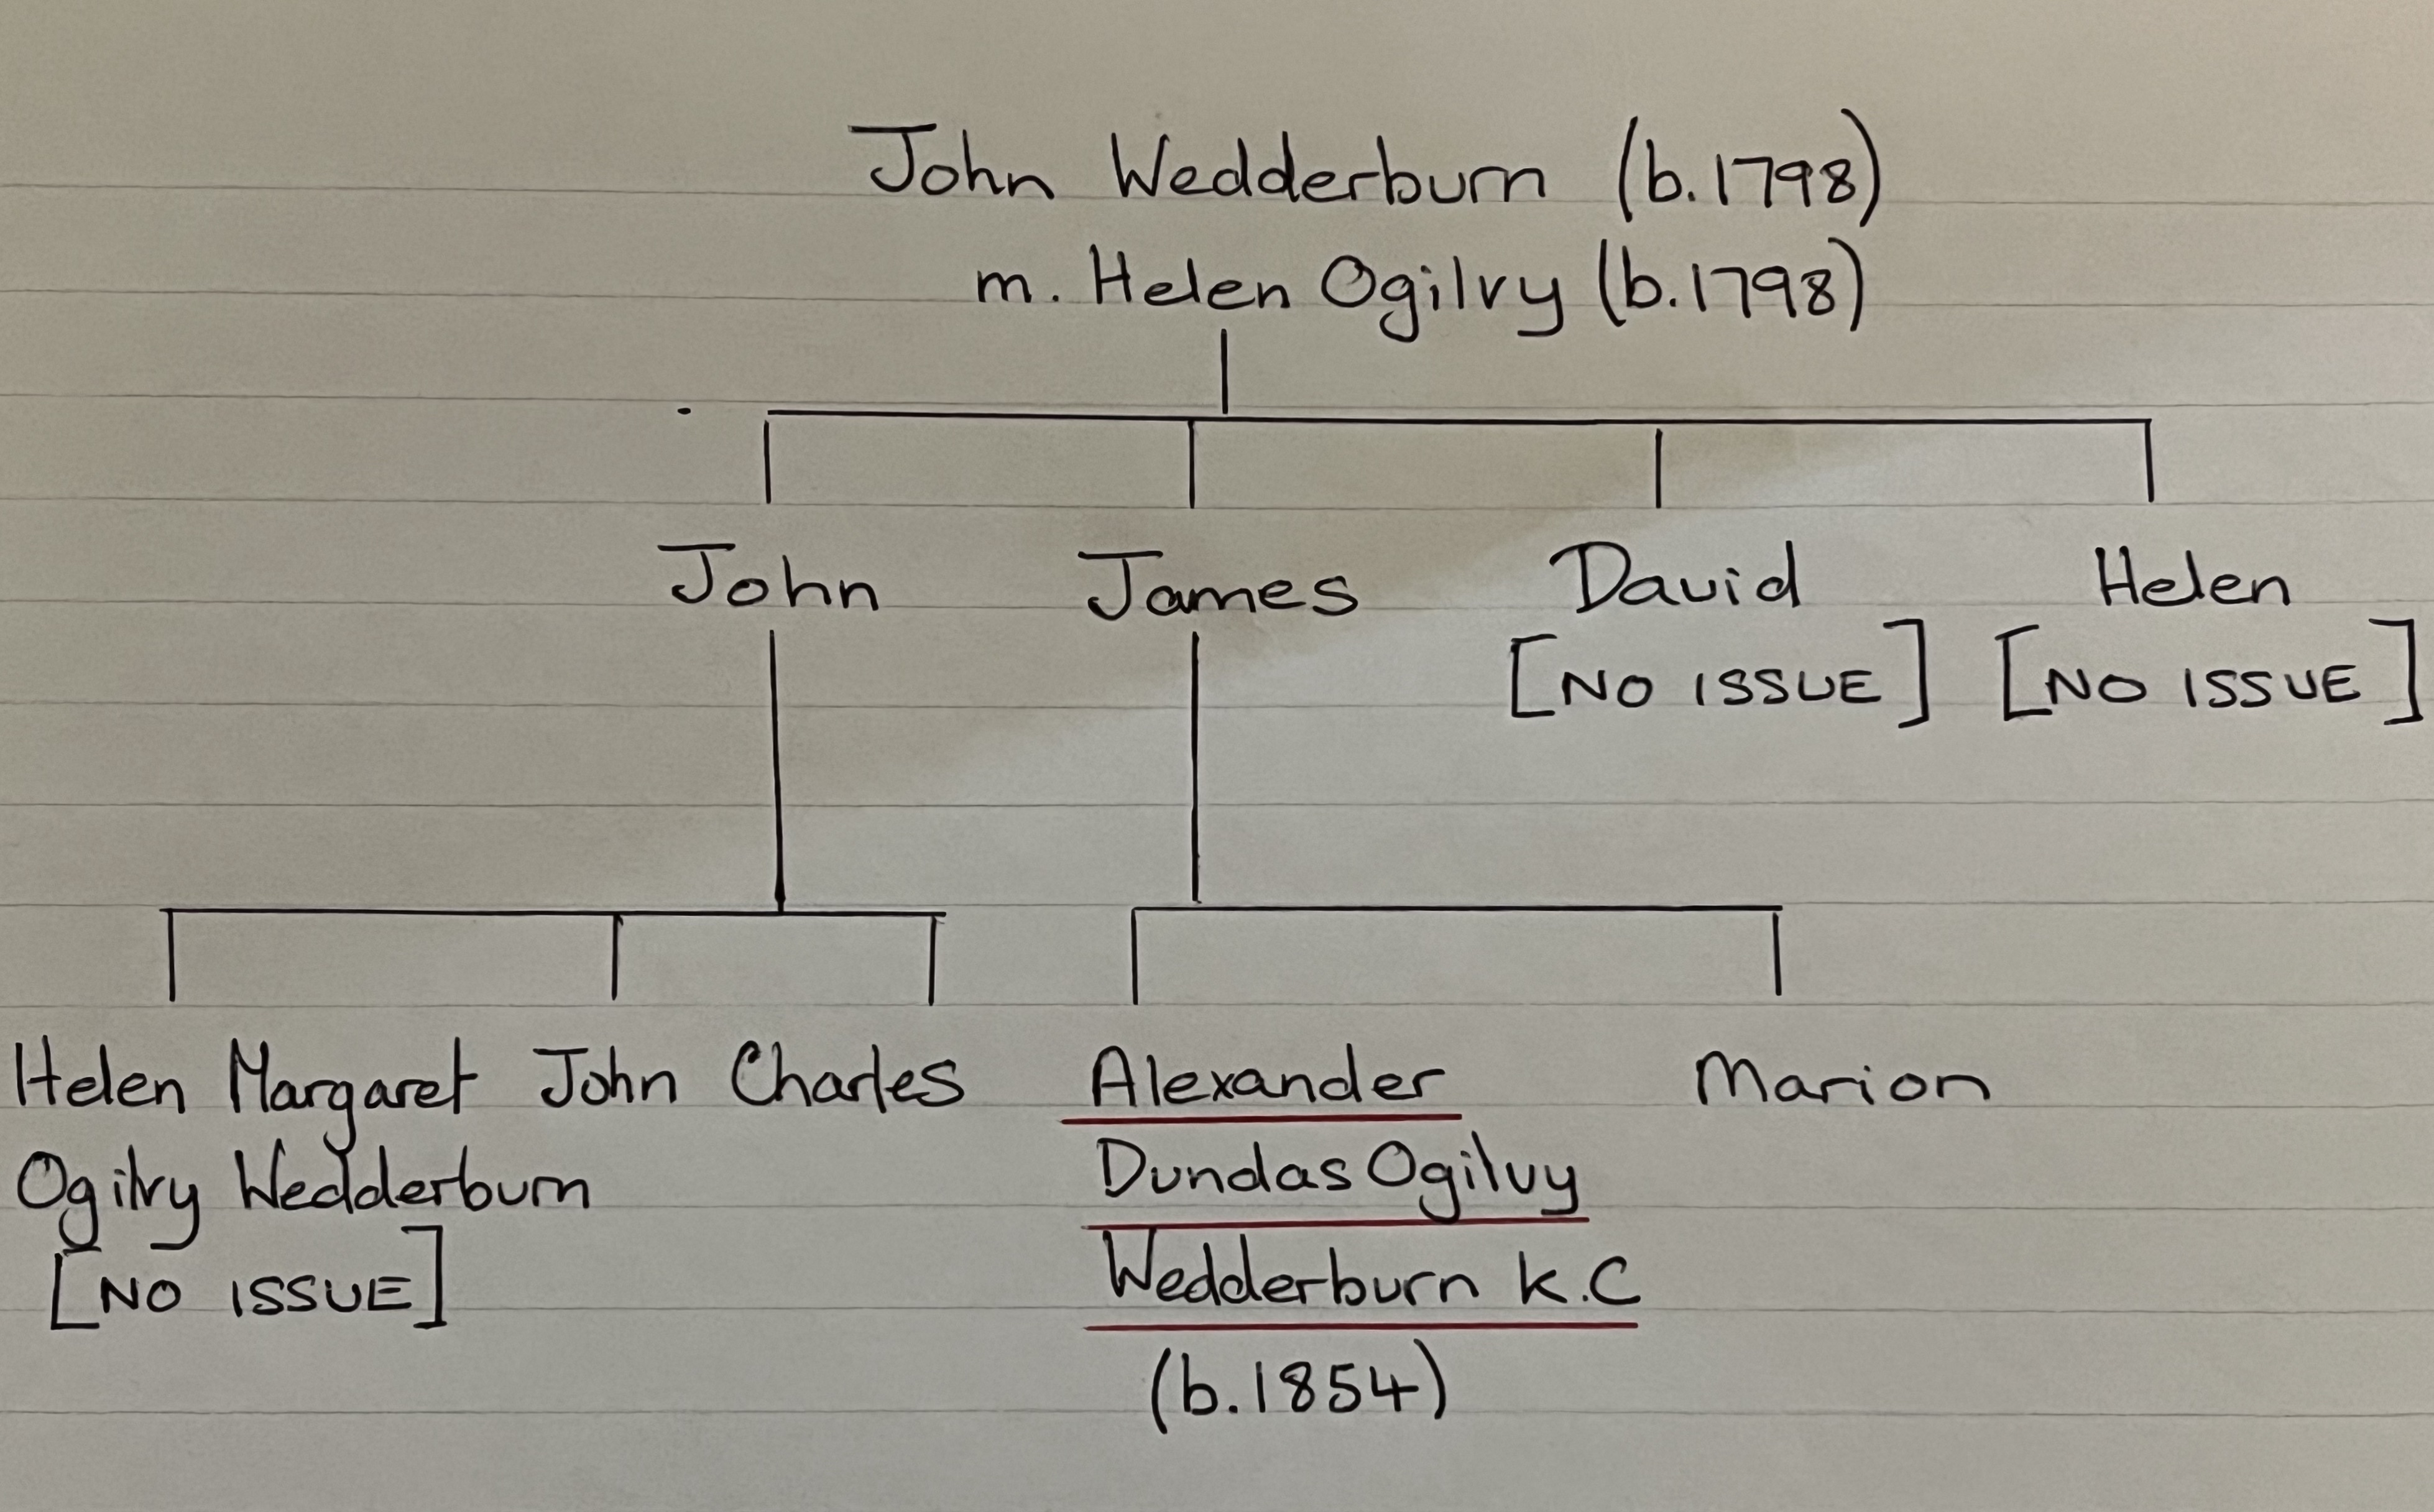
The notes and family tree accompanying the house (written by a member of the long line of family owners) provided the following information:
"It is thought this Dolls' House was made for 2 sisters, (1st cousins of Alexander Wedderburn K.C.) in about 1850-1860."
It's my dream scenario with an old dolls' house to know the names of the lucky children who first played with it, so I immediately set out to identify these two sisters. It didn't take me long to hit a stumbling block.
As Alexander Wedderburn K.C was a member of the British peerage and his wife was named as Mathilde Segelke in the notes, it was easy to discover that he was Alexander Dundas Ogilvy Wedderburn K.C., born 1854. (To keep things simple I'll refer to him simply as 'Alexander' from here on.)
Excellent. Next to find the two sisters. To be Alexander's first cousins, they would have to be the children of his uncles or aunts. This is where I met a difficulty.
As this section of the family tree I've drawn shows, Alexander only had one female first cousin - Helen Margaret Ogilvy Wedderburn (I'll refer to her simply as Helen from here on).
Of course Alexander could also have first cousins from his mother's side of the family, however another delve into his ancestry revealed that his mother was an only child, so no uncles or aunts there to provide first cousins.
So was the house made for first cousin Helen alone? She was born in 1857 which would fit with the dates in the notes. But then where did this idea of two sisters come from? An idea which has presumably been passed down with the dolls' house for more than a century and a half.
I have a theory which suggested itself to me when I was looking to see where Helen might have lived when the house was made for her, if indeed it was.
The 1861 Scotland Census shows that when Helen was three years old, she, her parents, and her brother John, were living with her paternal grandmother Helen Wedderburn (nee Ogilvy - I will refer to her as 'Helen senior' from here on) who was 'head of household', her husband John Wedderburn having died in 1839. Interestingly though, there was another person living with them and this was Helen senior's older sister Lady Mary Ogilvy.
So here we had two sisters living in the house with Alexander Wedderburn K.C.'s first cousin Helen: her grandmother (born 1798) and her great-aunt (born c1792). Was the dolls' house made for these two sisters?
There were actually five sisters amongst Helen senior and Lady Mary's eleven siblings and if the dolls' house had been made for them, then it can easily be imagined that it ended up with the youngest two, Helen and Mary. Or it might simply have been made specifically for the two youngest.
And if the dolls' house was in Helen senior's house when Alexander's first cousin Helen was living with her aged three, she would surely have had the opportunity to look at or perhaps even play with it.
When Helen senior and Lady Mary died within a few months of each other in 1868, when Helen was aged eleven, it follows that the dolls' house would have been bequeathed to her as Helen senior's granddaughter from her eldest son and particularly as Lady Mary had never married and therefore had no direct descendants.
It can also easily be imagined that after the house was later passed to Alexander's line of the family, at some point as it went down that line, the knowledge that it was made for those two sisters might have become conflated with the knowledge that it came to Alexander's line through his first cousin Helen.
If all of this were so, then the house would actually date to c1780-1800! Of course I have asked myself whether the house itself - its architecture and its original interior decor - would fit with this theory. I am no expert on houses of those dates but, as I will cover in a separate blog post, my feeling is that it really could be that old, though I will seek further advice on the matter.
One outcome of the earlier dating would be a need to rethink the name of the house. I have been calling it Wedderburn House, but if my theory were to prove correct then it would be more accurate to call it Ogilvy House, since that was the family name of Mary and Helen when it was made.
The [Possibly Irrelevant] Question of Where 1st Cousin Helen Lived
Going back a step, I mentioned that I was looking to see where Helen (Alexander Wedderburn K.C.'s first cousin) might have lived when the house was made, if it was made for her. The 1861 Scotland Census transcript gives Helen senior's address (where first cousin Helen was living with her family) as "Rosebank Rd" in the civil parish of "Lasswade" in the county of "Midlothian" (Scotland). The census also states that she was born in "Roslin, Edinburgh.
It's odd that no house name or number is given for "Rosebank Rd" as this information would usually be noted and I wonder if perhaps there has been some sort of error in transcription. Perhaps it was "Rosebank Ho" as in 'House' and not "Rosebank Rd"? Unfortunately the original document isn't available to view online so I can't check.
Rosebank House Roslin c 1910
My research did turn up this photo of Rosebank House, Roslin (demolished in 1950) and both Lady Mary and her sister Helen are recorded as having died at Rosebank, Roslin (both in 1868). There is a Rosebank Road to the north of Edinburgh, but Roslin is 7 miles is to the south of Edinburgh, so there is an element of uncertainty.
In any case, by the time of the 1871 Scotland Census, Helen is thirteen and living with her parents and brother at Liberton House in the civil parish of Liberton in Midlothian. This also states her place of birth as "Roslin" but in later Censuses it is spelled "Rosslyn", an alternative spellings of Roslin (also Roslyn).
Of course, all of this may be quite irrelevant if the house was made for the Ogilvy sisters two generations earlier!
The [Possibly More Relevant] Question of Where the Two Sisters Mary and Helen Lived
So if the dolls' house was made for the two sisters Lady Mary and Helen senior, where would they have been living at the time?
According to the Scotland Census records, both sisters were born in Balnaboth, Forfarshire in 1792 and 1798 respectively. Their parents were Walter Ogilvy and Jean Ogilvy, and the family seems to have been living at Balnaboth for some time prior to Mary and Helen's births, so it seems likely that this is where the dolls' house was made.
Balnaboth is near Kirrimuir, Angus (Scotland) which is about twenty miles directly north of Dundee. If this was where the dolls' house first came into being, it is likely to have been made by either an estate carpenter or a local carpenter who worked for the estate.
Regardless of whether the house was made 160 years ago, or 230 years ago, at least one thing seems reasonably certain, and that is that the house started life in Scotland.
From First Cousin Helen to Alexander Wedderbank's Line
So, on to the next leg of the dolls' house's journey. The notes accompanying it tell us that from Alexander's first cousin[s]...
"It then was passed to Peggy Wedderburn (later De La Rue & then Sutton), and to her daughter Griselda."
This section of family tree I've drawn shows that journey (the broken red arrows).
First cousin Helen (who never married) had no children, neither did her younger brother John. Her youngest brother Charles did marry but not until 1898 and her only niece wasn't born until 1904 (when Charles was forty and Helen forty-seven).
In the meantime, Helen's first cousin Alexander had his daughter, Margaret Griselda, known as Peggy, in 1888 and the dolls' house was passed to her from Helen.
The house then passed to Peggy's daughter, Ann Griselda, who was born in 1918.
From Griselda to Cousin Clarissa
The notes accompanying the dolls' house continue:
"Alister & Cynthia then had it for their daughters. Clarissa remembers playing with it at Elm tree Cottage in Willingdon, Sussex at the age of 3,4,5,6. It spent the war years in the barn of Parsonage Farm, East Hagbourne, Berkshire."
This section of family tree I've drawn shows this part of the journey as the house went to Alister for his daughters.
Luckily the family tree accompanying the house identified 'Alister' as Alexander Henry Melvill Wedderburn, Griselda's uncle (son of Alexander Wedderburn K.C.). Alister was married to Cynthia (nee Lubbock).
Alister and Cynthia had three daughters and Clarissa (the eldest) was born in 1925, so when the notes say that she remembers playing with the house at the "age of 3,4,5,6" this would have been 1928-1931 and the subsequent war years referred to were WWII.
The youngest sister, Olivia, was born in 1934, and when the war finished in 1945 she would have been age eleven. Clarissa would have been twenty.
From Clarissa to her Granddaughter Adelaide
The note accompanying the house (which is the first of two) concludes:
"In 1957 it was bequeathed to Clarissa & went to North End, Bledsoe, Bedfordshire, later to Bridge House, Great Barford, Beds, & to The Chantry, Great Barford, Beds, giving endless pleasure to countless children. 1992 given to Adam and Katie Robinson for Adelaide"
This section of family tree I've drawn shows the house's journey from Clarissa to her granddaughter Adelaide.
The family tree which accompanies the house shows that Clarissa married twice; firstly to "Ursuley", with whom she had two children; and secondly, in 1955 she married James Robinson after which she had a further three children, including Adam.
As the note says, Adam and his wife Katherine (Katy) Adelaide (nee Harben) were given the dolls' house in 1992 for their daughter Adelaide. It would seem from this that the dolls' house was in Clarissa's life for about sixty-four years (though in storage for part of that), including thirty-five in her later adult life.
From Adelaide to Eliza
Up until this point the house's journey had been relatively easy to follow. From here on however, it got trickier.
The two notes accompanying the dolls' house appear to have been written by the same hand and the second note, dated 7th April, 2012 is signed "Tonia":
"This dolls house was at Grandma's* house when I was little. I could only look at the top floor by standing on my tip toes.. Nolly's* bedroom was on the right.. she gave us sweeties that must have been 100 years old, like her! Adam & Katie moved to South Africa, so the dolls house came to me. Adelaide & Tilda had a fab time playing with it & when they were too big for it it came to Eliza Robinson for safekeeping... Love Tonia
Adam is my half uncle & a cousin too! *Grandma is Clarissa Robinson & *Nolly was my Great Granny."
From the note's content and tone, I am assuming that it was written to Eliza Robinson by Tonia when she was passing the house on to her.
The next step was to find Tonia's full name and to place her in the family tree.
A business name on the back of the note led me to discover Antonia’s married name and from that I was able to discover her maiden name, Antonia Robinson, which is what I’ll stick to here.
Fitting Antonia into the family tree wasn’t quite so easy but this section of family tree which I've drawn (in green if you have good eyesight!) shows where I believe she sits in it and two things point to this…
Firstly, I know from the family tree accompanying the dolls' house that Clarissa's two children from her first marriage were called Michael and Antony and an announcement of Antonia's engagement in The Times names her father as Anthony (though no surname given is given in the digitised version available online). Secondly, Antonia mentions that Adam is her half-uncle, so it would seem to follow that her father has to be one of Adam's half-brothers.
The fact that Antonia mentions that Adam is also a cousin is probably a clue too, but I have to confess that my brain will not find its way around that one! The next statement that "Grandma is Clarissa Robinson & Nolly was my Great Granny", may (or may not) have been intended to clarify this point but since I don't know who Nolly was it doesn't help me - Antonia would have had four great grannys, though my best guess is that she's referring to Clarissa's mother, Cynthia, who was born in 1899 and lived until 1986, so not quite a hundred years old but that reference may not have been meant to be taken literally.
I did wonder if “Ursuley” and James Robinson might have been brothers, though The Peerage does not confirm this. The Peerage is unswerving in referring only to members of the British peerage and Clarissa’s first marriage is not mentioned, which in itself suggests that “Ursuley” and James were not brothers. Nor is “Ursuley” listed in The Peerage as a child of James’ father, so this theory would seem dead in the water.
As an aside, I'd love to know what "Nollys bedroom was on the right" referred to. A room on the right in the dolls' house? If so, what could that mean? Or does it refer to a room on the right in a real life property somewhere?
The note confirms that the house was then passed from Antonia to her niece Eliza Robinson.
The Sting in the Tail
The reason I know that Eliza is Antonia’s niece (the daughter of one of her brothers) is because I managed to make contact with a member of the family. I had hoped that in doing so I would be able to fill in some of the blanks and complete the picture in terms of the house’s journey to me.
Unfortunately, this didn’t go to plan. But that’s another story and one which it has taken me over six months to recover my equilibrium from*. Maybe I will post about it another time, but suffice for now to say that sadly that line of enquiry is no longer an option.
What I do know for certain is that as the latest guardian of this venerable dolls' house, I will take my responsibilities very seriously. The task of removing several layers of paint to reveal the original is already underway and I will post a progress update in due course.
Until next time,
Zoe
*During which time, I removed the original version of this post, which is why some of you will recognise it from last July.